Tag Archives: Black Pepper

Growing Black Pepper

We have had black pepper (Piper nigrum) plants for about ten years…even though I have written a few articles on this plant, it has not produced a consistent harvest until now. When we first started the farm, we thought that plants could be stuck anywhere and they would sort themselves out(!) The wonders of innocent and inexperienced youth!! And so we planted our black pepper plants beside palm trees hoping for a bountiful crop. This method proved quite haphazard as some years we would gather black pepper and other years, there was nothing at all.

Black Pepper Cuttings.

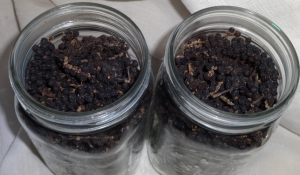
From my observation, the pepper plants did not grow well in these conditions because the palm frond shaded them out too much. And also, a lot of the blackbirds (and other birds) hung around the shaded palm areas to get the ripe pickings even before we noticed. When we did get harvests, it was great:

Black Pepper.

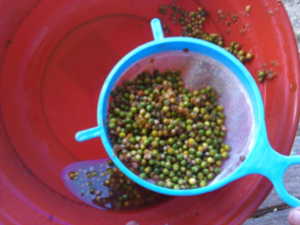
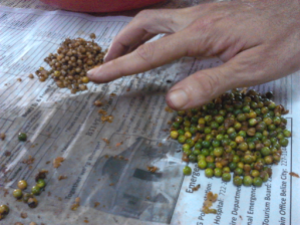
I even made white pepper which is pretty labour intensive:

White Peppercorn

Wonderful:

Harvested Green Peppercorn.

Anyway, the years passed by so quickly and it was only two years ago that we finally had the time to re-address the black pepper crop which we found meagre and inconsistent. This time we decided to erect posts and plant cuttings beside them; this is a picture taken in 2018.

Growing Pepper.

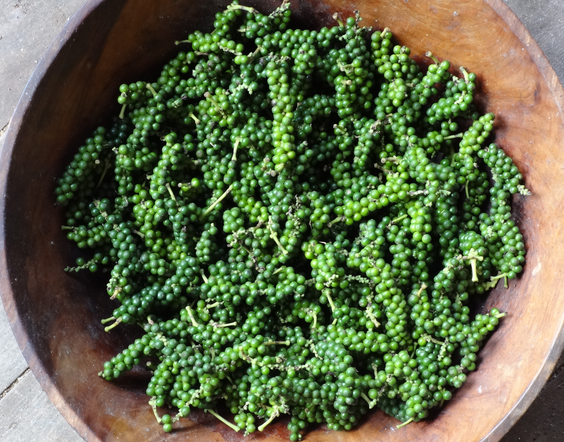
As you can see the black pepper has been planted in full sun on the south-side. They have been planted in tyres to give them some protection from heavy rains. This was a success and the plants grew up the posts very quickly and started producing within about a year. Presently, we are in year 2 and the vines are producing all year round! I am so pleased because I can use fresh black pepper everyday…what a lovely luxury!!

Black Pepper Plant Year 2

We have six plants that provide all the black pepper that we need for the kitchen. Everyone should have a couple of these in their backyard…they don’t take up much space and produce continuously! See the second picture below…they don’t need to be planted so far apart…we had put chicken wire in-between the posts thinking that the vine would preferentially spread out. However, they seem to be quite happy just growing up wooden posts like this:

Black Pepper Plants

Okay, have a nice Friday night!!

Hot and Sunny!

The weather is hot and sunny right now.  This is probably a good thing because Gnome is in the middle of pond digging.  The first pond is almost done…just needs to go a foot deeper.  The first part that I showed you last week has been lined with construction plastic, the sides have been weighed down with heavy rocks and taro and peanut have been planted.  I am not going to show you a picture yet because it still looks like a messy construction site.  We had to also fence off the whole area because the goosies thought that the new pond was a new swimming and socialising area.  I had to chase them off with a broom when they started tearing up the planted peanut.  Yes, those dastardly goosies are getting all feisty for breeding season and they are spoiling for a fight!

Goosies.

This is a picture of “Silly Goosie”; she is a bit of a loner and makes a weird “whir…whir…whir” noise as opposed to the more familiar “ghwaa! ghwaaa!”  You may only appreciate my goosie communication observations  if you are being surrounded 24 hours a a day by a gaggle of geese!  Usually she walks about in the yard all the day talking to herself while the rest of them go off swimming.  She seems happy enough.

Silly Goosie.

Aside from digging in the dirt, Gnome has been air-layering to get more fruit trees for our newly organised orchard.

Air Layering Black Sapote.

I have been planting black pepper cuttings:

Black Pepper Cuttings.

The plan is to plant 10 to 20 vines behind the house to harvest enough pepper to use for the year.  I have neglected the pepper in recent years and have resorted to buying white pepper…I know…that’s not like me at all!!  The bought white pepper is bad quality and I just can’t get that lovely, Chinesy peppery flavour and aroma into my food.  Time and time again, I am finding that money can’t buy everything and if I want something good, I have to do it myself!  So back to looking after my plants and harvesting and processing…

Black Pepper.

Busy With Coughs And Colds!

Together.CourtyardThe business of coughs and colds always fall to the responsibility of the GP and right now, we are having a busy time with it!  As I look back at previous years, I have noticed a spike of this type of ailment in June.  I think this co-insides with the abrupt change in weather from from dry to rainy season in Belize.  On-call, off-duty, on-duty….it’s all the same to a doctor…everywhere we go right now, we are bumping into people with coughs.  Just a few days ago, I stepped into a man’s shop and he was lying on his back (on crates) coughing and spluttering.  I can’t get away from the call of duty.  😉

I am now armed with a stethoscope and medical paraphernalia as I walk down the streets of Punta Gorda.

Munchkin.Hair.Flowing

We have noticed that some  people do start off with a benign cold here…they call it “fresh cold” in Belize.  It usually goes away by itself with a bit of rest, good wholesome food and TLC.  There are however some people who don’t rest and continue to erratically go through life in the same stressful and deleterious way.  These are the ones who get into trouble and the upper respiratory tract infection develops into pneumonia.  We end up seeing these people as patients.

Anyway, for all you people who have recently developed the sniffles…STOP.  Give your body a rest!!  Doctor’s Orders!!  And here is an easy drink that you can make at home (3 times daily for the next 7 days) to help reduce the phlegm and cough.

Munchkin.Drinking

Cough And Cold Remedy.

Put the following in a mug:

Juice of one lime

1 tbsp honey

1/4 tsp ground black pepper

1/8 tsp chili powder (or a quarter piece of fresh habanero, finely chopped)

1/4 tsp of ground dried ginger (or 1/2 tsp fresh ginger, finely chopped)

Top up with hot water.  Allow to steep for 5 minutes and then drink up.

Also, go to sleep early, rest and stop running around!

Processing White Peppercorns.

Munchkin.Feeling.Rightous

This year we decided to process our pepper into white pepper.  Usually, we just pick them green…

Harvested Green Peppercorn.

And as they dry out in the sun, they become black peppercorns.

Black Pepper.
Black Pepper.

Because I mostly cook Chinese food, white pepper is actually more useful for me from a culinary point of view.  The preparation of white pepper requires a bit more work.  This is what you do:  Pick the peppercorns when they start turning red:

Picked Peppercorn.
Picked Peppercorn.

Then place these peppercorns in water to let them all ferment.  After a while, the water will get bubbly and murky.  Each day, dip your hands in the water and rub the peppercorns with the palms of your hand.  This “retting” procedure loosens the outer shell to release the white peppercorn.  Do this for 7 days…you can throw away the outer shells each day but leave the white peppercorns to ferment and do their magic.  It all gets rather smelly but hey, I think it is really important to understand the value of doing things yourself.  Now I know why ground white pepper costs $30 Belize Dollars per pound and I will no longer complain about the price!

On the 7th day, drain off all the water:

Processing White Pepper.

Separate the white peppercorns:

Sorting White Pepper.

You will find that the peppercorns are at different stages.  Remove the white peppercorns and let them dry out in the sun.  The rest of the pepper (which still has the outer hard shell) can be placed back in a clean bowl of water.  At this stage, you can add newly harvested pepper to repeat the 7 day process of fermentation again.

So there you go.  You will find that when you consciously spend the time and energy in processing your own food, it becomes a matter of necessity.  It isn’t about economics anymore…it’s about eating good food that money can’t buy.

Coconut Feta Cheese Update and Gnome Project.

Munchkin.More.EatingLast week, I wrote about making coconut milk cheese – feta style…this is the update. After the three days of dry brining, I took out the cheese and cut it into pieces like so:

Coconut Feta Cheese.

The cheese had dried to a firm consistency and so it was easy enough to cut without too much crumbling.  I then placed them in 7% brine; one jar with bay leaves and the second flavoured with whole black peppers.

Flavoured Coconut Feta in Brine.

I am going to leave the jars out at room temperature so that they can ferment further for two weeks.  After that, I will I will let them continue to ferment for several months in a cooler area (probably the refrigerator).  Hope they taste good after all the waiting!!

Gnome Update:

Gnome.Doing.Magic

Gnome has started on a project where he is digging out a small pond next to the house:

Pond Digging.
Pond Digging.

He has also started up some lotus seeds in a basin which have germinated and come up nicely:

Growing Lotus in Basin.

The plan is to have a lotus pond next to the house.  Apart from the beautiful flowers, we also want to grow them for food.  We would eventually like to make our own lotus paste to make Chinese sweets:

Lotus Paste.
Lotus Paste.

This was sent to us as a gift all the way from Singapore; I am saving it to make moon cake this year.  Also, lotus seeds are really tasty in Chinese soups…yes, you can actually buy these in Belize!

Dried Lotus Seeds.
Dried Lotus Seeds.

Lotus root is also quite a treat and I would love to grow some of our own because I haven’t eaten it for over a decade since I came to Belize.  It will probably take over a year before we can harvest any to eat.

Aaaaargh…more waiting!!

Hatcho Miso Belize Style.

Gnome.Straight.SmileMiso Madness is almost over as the Munchkin is starting to feel twitchy over our dwindling supply of soap…Together.Munchking.Pointing

…which means that our run of frenzied fermentation is coming to an end and the previously, prematurely terminated Soap Marathon is going to have to resume (yeah, our soaps are really popular and people just can’t get enough of them; this is A Good Thing, she tells me ;-P).

After the frenzy of rice koji making and the resulting shinshu and shiro misos, we are ending our run with a couple of pig tail buckets of hatcho miso.  The first bucket was made two days ago, however, it turned out to be about a gallon short because I held back some of the black bean koji to reinoculate the next batch of beans.  There was a slight set-back with that particular batch (yes, yes, I’m sure you’ve heard about the Great Bean Bungle…let’s move on…) and to make a long story short, another batch had to be introduced into the equation.  Anyway, back to the short bucket:  I just “happened” to have a gallon batch of miso from last year which was made with cacao beans and while very aromatic, the chocolate taste was just too overpowering (yes, chocolate-lovers, this is actually possible!).  So, we emptied all of the containers, mixed them together again with the addition of bird peppers (Korean-style??) and a generous handful of black peppercorns.

Mixing Black Beans, Last Year's Chocolate Miso, Chilli Peppers and Black Peppercorns.
Mixing Black Beans, Last Year’s Chocolate Miso, Chilli Peppers and Black Peppercorns.

And voila’, the first full bucket of Belizean Style Chocolate (Cacao Bean) Hatcho Miso (with chilli and black pepper) was born:

Super Hatcho Miso.
Super Hatcho Miso.

Time to start thinking about soap…

Beef Jerky and Chilli Mead.

Gnome.Surprised.No.GlassesBrewing has come to an end…boo-hoo!  After completion of the Resurrection Metheglin there was one last brew bucket to be used and alas, this is what has happened, the final fermentation:  Black Pepper Beef Jerky and Chilli Metheglin.

All Buckets have been used.
My collection of trigeminal buckets.

The idea for this unusual mead had its inception from reading an old article on Cock Ale.  Apparently, an old, parboiled cock (a rooster, you sick folk ;-P) that has been flayed, stamped in a stone mortar and put in a sack with other aromatic goodies can be steeped into ale to add just a little bit more body!  Well, with a leap of tangential thinking, derailment and frank thought disorder, I took Cock Ale and got…ta-da…Beef Jerky Mead with Chilli!

Black Pepper Seasoned Beef Jerky Ready to be Simmered.

Extrapolating (or intrapolating or just plain guesstimating) from the original recipe of one cock for 10 gallons of ale…and making some assumptions as to the size of your average Belizean cock; and, also, considering the difference in flavour between fowl and beef…we settled on 250g of beef jerky for five gallons of mead.

This is the amount of chilli pepper we used:

Pepper for Beef Jerky Mead.

…a nice, wild hybrid of jalapeno (sorry, no tilde) and bird pepper that turns purple before red.

I aimed for a slightly higher strength of alcohol than usual (6-7% alcohol) in order to better hold the expected heaviness from the beef and chilli; which in this case, was achieved with four and a half “quarts” of Belizean Rainforest Honey…

Belize Honey "Quarts."
Belize Honey “Quarts.”

The beef jerky was simmered with half the chilli for about an hour without the honey, making a nice and spicy beef broth.  After which, the honey was added and brought to the boil for a second before cooling and pouring into the brew bucket.  The yeast used was my standard “evolving” lager yeast.

Let’s see how it turns out!

Black Pepper Galore!

Munchkin.Another.LookThis year, our black pepper plants started bearing well.  The last few years, we have just had a few minor fruits but not much to speak of.

Harvested Green Peppercorn.

The picture above shows picked peppercorns from two plants only.  The green drupes started in September and I had actually been watching them all this time waiting for them to mature to red peppercorns.  At that stage, white pepper can be made through a process of retting and fermentation.  But, alas I have grown impatient and decided to have black peppercorns this year.  So, for the last few days, the pepper has been spread out to dry in the sun.  It took 3 days for the pepper to dry completely to its black state.  I managed to get two quart jars of dried black peppercorns…not bad from just two plants.

Dried Black Pepper in Jar.

Just out of interest, to keep the green colour of the pepper they have to go through a preservation process (using sulphur dioxide like in dried fruit) before drying.  Similarly, to get red peppercorns, preservation of colour with a chemical is used before drying.

Our black pepper plants were grown from cuttings about 2 to 3 years ago. This perennial woody vine prefers shade and so we planted ours next to coconut trees so that the vine would grow up the trunks.  This was a great combination because the fallen coconut leaves produced humus and leaf litter which set up perfect growing conditions for the pepper. Piper nigrum are known to produce fruit for up to 7 years after the first flowering.  I found some pepper seedlings in the leaf litter and I have potted these so that we never have to buy black pepper again!

Black Pepper Seedlings.