Tonight we have a Bengali style curry. Thank-you Rumpa for the priceless cooking lessons back in the good old days in Glasgow. This curry has our own coconut cream (which you can purchase at Green Supaul’s in Punta Gorda).
Coconut Cream.
I love cooking up curries because the wonderful aromatic herbs pervade through the house. This is when the dogs and the cat start sniffing around because it smells so delicious! Even the cat gets curry sauce on his gizzard!
Cat Curry Feast!
Herbs and Spices used; cardamom, star anise, cumin seeds, mustard seeds and bay leaves.
Powdered spices used; curry powder, yellow ginger (tumeric), green chili (home-made), cinnamon and clove.
Powdered Spices.
Ooooh…look at this. A “quick” curry in 2 hours (most other curries take about 12 hours!) with fresh coconut cream!
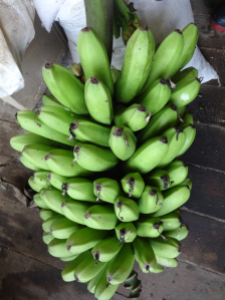
We are making our own banana flour right now. With huge bunches of green bananas, we find that the best way to preserve them is to process them into flour.
Bunch of Green Bananas.
This actually involves quite a lengthy process but hey…that’s why we have chosen to live like this. The green bananas are peeled and then grated like so (by Munchkin of course):
Grating Green Banana.
The shredded bananas are then dried out in the sun. Once dehydrated, they are crushed by hand into crumbs and then milled (Gnome Job):
Making Banana Flour.
And this is what you get:
Eighty Bananas of Flour.
Eighty green bananas fills roughly half a gallon jar and weighs about 2lbs (1kg). And now Gnome has presented me with a challenge:
“Munchkin, cook something yummy with it!”
By the way, this product is not for sale because it contains too much blood and sweat! 😉
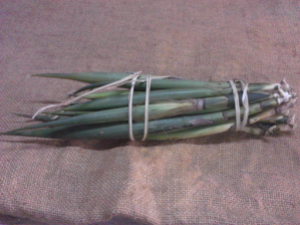
Pacaya is in season right now and is being sold in bunches at Punta Gorda Market. Don’t miss out on this delicacy because it is only harvested for a short time. These are the male inflorescences of the palm Chamaedorea tepejilote and are hand-picked in the wild rainforests of Toledo.
Pacaya From Market.
To prepare pacaya simply make a slit lengthwise (see upper picture) to reveal the flowers which are the edible part (lower picture).
Pacaya Peeled.
The Mayans at the market recommend that I chop the pacaya into pieces and cook it with egg. I haven’t tried this yet. I actually boil the pacaya for about 5 minutes and then I drain the water. You can boil it for up to 20 minutes if you would like to remove the bitterness. I like the bitter taste and I think that it is part of the whole culinary experience.
Pacaya Boiling.
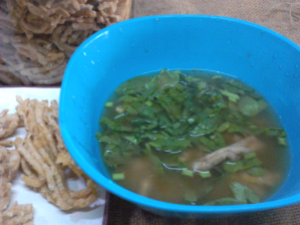
I’ve been eating the pacaya with a dash of soya sauce served with a bowl of miso soup. This food has a crunchy texture with a pleasant bitterness.
Pacaya and Miso Soup.
I am sure you will find traditional recipes for pacaya on the Internet but if you are used to reading my Blog, you will be aware that I enjoy creating my own dishes. Next on the list is pacaya tempura…ooooh, can’t wait!!
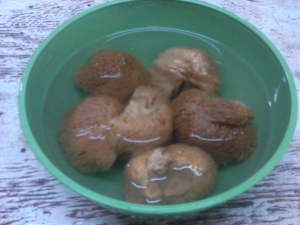
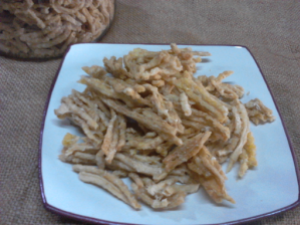
I wasn’t sure how to title this post because this particular mushroom has so many names including: Lion’s Mane Mushroom, Bearded Tooth Mushroom, Satyr’s Beard, Bearded Hedgehog Mushroom and Pom Pom mushroom. In Asian cuisine, it is known as Monkey Head Mushroom. I have never found this particular mushroom in the wild but luckily for us you can obtain it in the dried form from the Taiwanese Supermarket in Belize City. For a long time I had avoided these mushrooms because I did not know how to prepare them for cooking. The Chinese person at the supermarket would look about me dubiously (because I kinda look like a Chinese person but act like a “white person”) and shake her head at me,
“…you know how to cook? If you don’t do it right, it taste bitter…”
Well, this time, the Chinese person in me broke through and I was determined to try these tasty treats!
This is what it looks like once it is soaked in water.
I did some research on the preparation and basically you just need to soak the dried mushroom in water for about an hour until it gets soft. During this time, you keep on changing the water until it turns clear.
After that you can cut it up into pieces and cook it anyway which way you want…sauted in butter, Chinese-style, in soups and stews, etc, etc.
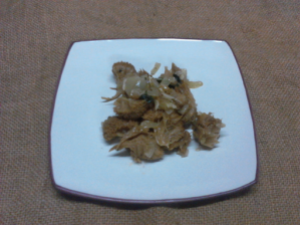
I’ll be posting up some new recipes with Hericium erinaceus over the next few weeks so watch this space. I did my first test cook by sautéing it in cacao butter with onions and garlic:
Sauted Lion’s Mane.
The verdict:
“It’s tasty! It tastes like chicken!!”
I replied by saying,
“Oh, but…on the Internet, they say it tastes like “beef!”
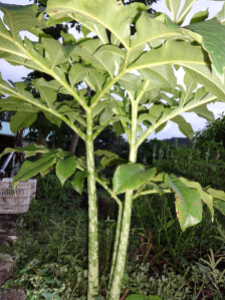
If you recall in a previous article, there is a certain ground root that we coined “The Brain” because well, we thought it looked like a big brain!
Elephant Foot Yam.
Kind of…you really have to be a doctor to appreciate the brain thing. Other names are Amorphophallus paeoniifolis or elephant foot yam.
This is what the plant looks like:
The Brain.
It has a characteristic spotting on the stem and it also produces a beautiful flower. Ours hasn’t flowered yet so sorry, no picture as yet.
The good thing about this yam is that it can be harvested and stored for about 3 months. This is great for the tropics because most ground vegetables have to be processed soon after harvest or else they go bad…take for example cassava. Anyway, I left this brain out on the veranda for months before I found the time to sort it out. This is how you prepare elephant foot yam:
Wear a pair of gloves whilst processing as the uncooked root contains oxalic crystals which can cause itchy dermatitis. Firstly pare the root with a sharp knife and then cut into uniform cubes about an inch in size. Wash thoroughly with water.
Pare and Wash Elephant Foot Yam.
Next, place in a cooking pot with a teaspoon of salt. Bring to boil and cook for about 30 to 40 minutes. After this, add about 100g (3oz) of cream cheese to the pot and boil for another 10 minutes. Traditionally, in Indian cuisine, curds or tamarind paste are added at this point to further remove the itchy sensation caused by the oxalic acid. I had neither ingredient in my kitchen, so I opted to use Philadelphia Cream Cheese which seemed to work in the same way.
Processing The Brain.
Once tender, drain off the water. You can eat it at this point or bag it into smaller portions to store in the freezer. The yam can be eaten as a substitute in any potato dish and there are numerous traditional recipes on the Internet; usually in the form of wet and dry curries.
Cooked Elephant Foot Yam.
This yam grows prolifically in the Tropics and so I recommend that every self-sufficient person should have a patch of this growing somewhere on their land. This is great survival food because there is so much of it!
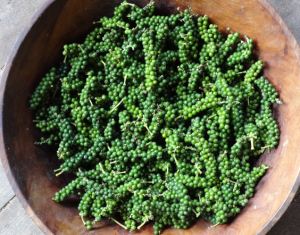
This year we decided to process our pepper into white pepper. Usually, we just pick them green…
Harvested Green Peppercorn.
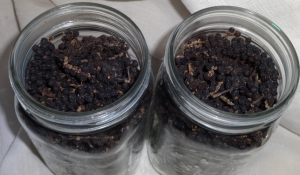
And as they dry out in the sun, they become black peppercorns.
Black Pepper.
Because I mostly cook Chinese food, white pepper is actually more useful for me from a culinary point of view. The preparation of white pepper requires a bit more work. This is what you do: Pick the peppercorns when they start turning red:
Picked Peppercorn.
Then place these peppercorns in water to let them all ferment. After a while, the water will get bubbly and murky. Each day, dip your hands in the water and rub the peppercorns with the palms of your hand. This “retting” procedure loosens the outer shell to release the white peppercorn. Do this for 7 days…you can throw away the outer shells each day but leave the white peppercorns to ferment and do their magic. It all gets rather smelly but hey, I think it is really important to understand the value of doing things yourself. Now I know why ground white pepper costs $30 Belize Dollars per pound and I will no longer complain about the price!
On the 7th day, drain off all the water:
Processing White Pepper.
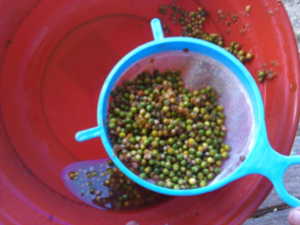
Separate the white peppercorns:
Sorting White Pepper.
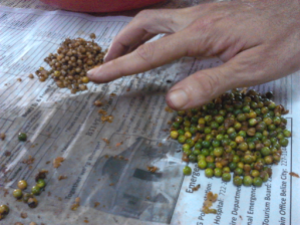
You will find that the peppercorns are at different stages. Remove the white peppercorns and let them dry out in the sun. The rest of the pepper (which still has the outer hard shell) can be placed back in a clean bowl of water. At this stage, you can add newly harvested pepper to repeat the 7 day process of fermentation again.
So there you go. You will find that when you consciously spend the time and energy in processing your own food, it becomes a matter of necessity. It isn’t about economics anymore…it’s about eating good food that money can’t buy.
A couple of weeks ago we harvested fresh cassava from the farm to make “Cuppa Cassava” which is our own home-made version of an instant noodle meal. As described in an earlier post, we prepared the root by peeling, cutting into pieces and steaming. After that, we put the cooked vegetable through a meat grinder in order to homogenize it and obtain a “noodle-look.” Then it was placed in the sun to dry for three days.
Instant Cassava Noodles.
We made an “instant” quick meal by adding boiled water (about 1+1/2 cups) to a handful of dehydrated cassava noodles; we covered this and allowed the vegetable to soften and cook for 10 minutes. At 7 minutes, a teaspoon of miso (our famous Peach Palm Miso) and a 1/4 cup of finely chopped green spinach were added to the mixture. And Hey Presto…Cuppa Casava Ramen was ready to eat!
Cuppa Cassava Ramen.
The cassava noodles had a chewy, firm texture with a bite. We both agreed that this was a good preservation method and this was definitely worth having in the pantry as “farm-made fast food.”
Hello Everyone!! For our dedicated followers out there, you may remember that about a week a ago, Gnome gave me two banana blossoms (flowers) to give to the guinea pigs. I promptly refused because I was determined to make yum-yums out of them.
Banana Blossoms.
Well, I did some research on preparation of the banana blossom for cooking and this is what I did.
I took off the outer petals (bracts) of the banana flower, layer after layer, until I got to the inner piece which looked like a little cabbage.
Outer Parts of Banana Flower.
While taking off each petal, there was a layer of florets in between the bracts, which are pictured below.
Cleaning Banana Flower.
According to my research, you can eat these florets by painstakingly going through each one of these to remove the outer calyx and the pistil. I did one for the picture and then thought to myself that it was extremely tedious and I wasn’t bored and hungry enough to do the rest.
I finally got to the heart of the flower.
Cleaning Banana Flower.
I cut it into pieces, as instructed, and placed them in vinegar water to remove the tannic properties.
Soaking Banana Flower.
After, a couple of hours, the tannin was partially removed to leave edible parts that tasted like cabbage. They didn’t taste that great and I didn’t think that it was worth all the trouble of preparation and soaking time to get something so bland and uninteresting.
I decided to give the rest to the piggies after-all.
Piggies Like Banana Blossom.
In conclusion, I am glad that I tried to prepare the banana blossom so that I could make up my own mind as to whether it was worth it or not. Outside the cultural context of eating banana flowers in India and South East Asia, I can only view this as a poor cabbage substitute. For the amount of energy, time and effort required in preparation, I would rather give these flowers to the piggies to enjoy.
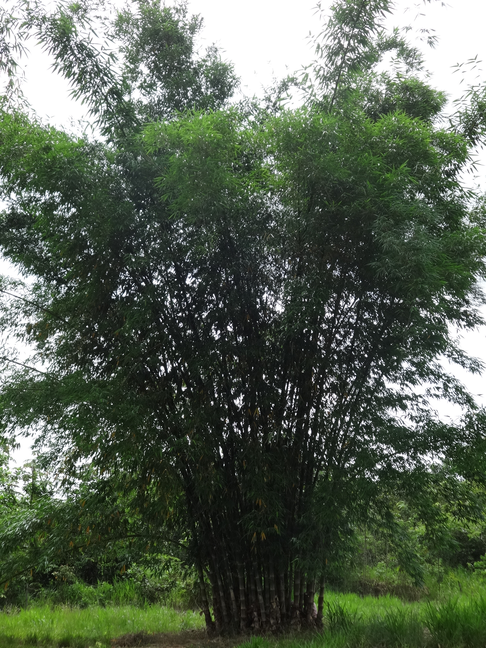
All the details, with extra step by step pictures are in the specific page but I will attempt to tantilise you with some highlights in this post!
This part is Gnome’s job.
Basically, you have to use a machete to cut into the culm and then you bang the machete with a sturdy stick to cut into it.
Harvesting Bamboo Shoot.
Once you have the bamboo shoot, you carry it off to a Munchkin to prepare:
Preparation of Bamboo Shoot.
The shoot is chopped into sections, peeled and then cut into chunk sizes.
Cut into Sections.Bamboo Shoot Layers.Bamboo Shoot Chunks.
Next, the chunks are boiled to remove the bitter components.
Once cooked, they are soaked in cold water for a few hours and then they are ready for eating or preservation. This time round, I layered slices of bamboo shoots with salt to dry brine.
Jar of Bamboo Shoots.
What fun!! I hope I have inspired some of you to go bamboo shoot hunting this season!!
And of course, we are eating fresh bamboo shoots everyday. Once you have tasted the fresh stuff, you will never want to go back to the canned shoots. Fresh shoots are velvety in texture with very little fibre. They are sweet and totally delicious. Here is a snapshot of what we had for lunch today: Sausage with exotic fruits and fresh bamboo shoots. What a treat…will post the recipe up tomorrow.
Sausage with Exotic Fruits and Fresh Bamboo Shoots.
Breadfruit (Artocarpus sp.) has an interesting history in the Caribbean as it was introduced into the area during the 18th century as a staple for the slaves in the British colonies. The breadfruit was originally from Tahiti. Nowadays, this past is long forgotten and breadfruit is enjoyed for what it is. A very yummy carbohydrate which when boiled, tastes just like potato. Interestingly enough, I have never seen this carbohydrate served in restaurants here as it is still seen as a “poor man’s food.”
Green Breadfruit.
Breadfruit trees bear prolifically and a single seasonal harvest can give hundreds of fruit.
We have young trees on the farm right now and they will soon start to bear in the coming years.
These fruit contain approximately 25% carbohydrate and 70% water. They are extremely versatile because they can be eaten green or ripe. The most popular way of eating them green, at least here in Belize, is deep-frying them oil. Other ways are boiling, pan-frying, baking and steaming. When the fruits mature, they turn soft and sweet. At this point, they can be made into various types of puddings. I have a friend (Filipino) who flattens the ripe fruit into a pizza shape and bakes it in the oven to make a sweet flat bread.
With this fruit, the need for preservation is very important since there is simply so much of it. I recently acquired four of these fruits and even with this quantity, I found it hard to think of ways to prepare and store. Once picked, they will mature in about 4 to 7 days.
Method 1 Preservation method: blanching and freezing.
Blanched Breadfruit.
This is a reasonable method but there is only so much space in the freezer!! You can imagine how stuffed my freezer is with so many other things.
Method 2 Preservation method: Sun Drying.
This is a better alternative especially when the breadfruit is 70% water and so you can cut the pieces to dry in relatively large chunks. They can then be stored in air-tight containers therefore taking up less space. Still, I will need to procure a 55 gallon container to store all of the dried product should my trees start bearing by the hundreds. That is what I call food security!! I will be experimenting with this method over the next few days; it is really, really hot and dry right now so they should dry really well. I will keep you updated on my Munchkin experimentation!!
There is also another method of preservation which involves digging a hole in the ground and storing the ripe breadfruits under-ground thereby allowing natural fermentation. I am not sure if that would work here because the water table is so high in Belize.
Breadfruit tastes very much like potato, more so than other tropical carbohydrates like cassava or taro. Because of this, it can be used as an alternative for any traditional recipes calling for potato. Watch this space for my breadfruit recipes!!
 Tonight we have a Bengali style curry. Thank-you Rumpa for the priceless cooking lessons back in the good old days in Glasgow. This curry has our own coconut cream (which you can purchase at Green Supaul’s in Punta Gorda).
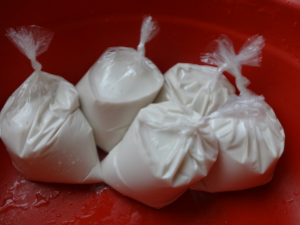


 I wasn’t sure how to title this post because this particular mushroom has so many names including: Lion’s Mane Mushroom, Bearded Tooth Mushroom, Satyr’s Beard, Bearded Hedgehog Mushroom and Pom Pom mushroom. In Asian cuisine, it is known as Monkey Head Mushroom. I have never found this particular mushroom in the wild but luckily for us you can obtain it in the dried form from the Taiwanese Supermarket in Belize City. For a long time I had avoided these mushrooms because I did not know how to prepare them for cooking. The Chinese person at the supermarket would look about me dubiously (because I kinda look like a Chinese person but act like a “white person”) and shake her head at me,