Category Archives: Belize

Full of Beans!

TogetherGnome was full of beans this morning and brimming with energy right from the get go.  He was out of the house by 5.30am with the brush-mower clearing the back of the farm.  I started cleaning buckets and basins, started a big pot of beans on the stove and washed sheets for koji making.  It was bean mania and the various bean preparations continued to exude beaniness into every square inch of the house.

When we finally met up again, Gnome had grated coconuts and I proceeded to squeeze the cream out of them.  I then laid out the coconut meal in the sun for the making of flour.

After this, it was back to the beans.  The night before we had decided upon making a “meatier” hatcho miso and so today we made Beef Jerky Hatcho Miso or as Gnome has coined it “Meat Lover’s Hatcho Miso.”  This involved putting 20 cups of fresh black bean koji and 2 lbs (1kg) of beef jerky through a meat grinder.

Beef Jerky Hatcho Miso.

There was a few cups of black bean koji left over so we decided to make a small batch of Taosi which is a Filipino fermented black bean preparation, made by soaking the koji in brine.

Taosi Fermenting Black Beans.

Next we took the freshly cooked beans from this morning and added more Aspergillus spores to start a continuous batch of black bean koji.  Our goal is to fill a 55 gallon drum with hatcho miso…more about that in a later post!

Making More Black Bean Koji.

We then had a brief intermission for food and refreshments.  For those interested, we still think that it is important to sit down and eat two proper meals a day, despite all the frenzy and excitement.  We had Chinese roast pork, pumpkins and shiitake mushrooms cooked in mead and sweet potato cakes.

Anyway, the next task was making Shinshu miso with the mountain of bungle beans from the freezer.  This was Gnome’s idea since I had been giving him such a hard time about the bungle.  Yes, we used up all the beans so problem has been solved.  We made 2 and 1/2 gallons of this…ready in one year!

Shinshu Miso.
Shinshu Miso.

Phew, it has been a bean marathon.  We were done by 2pm.

Munchkin and Gnome: Mad About the Beans!

On The Farm.

Munchkin.Another.LookThe whole house smells of bean juice with trays of hatcho miso and buckets of beans soaking in water.  At this point, all windows have to be opened or else one can get over-whelmed  by the fart smell of bean.  What better reason to take a look outside and tell you what interesting things are happening on the farm.

First of all, one jackfruit tree has started bearing this year:

Jackfruit on Tree.
Jackfruit on Tree.

We were not sure how to check for ripe fruit so we had to look up information on it; apparently, you can harvest them when they are green and to speed up maturity you can place it in the sun.  When ripe, the outer shell is suppose to crack with firm pressure placed on it.  Well, we have one of these babies getting a nice sun-tan outside and we can’t wait to eat it!  Jackfruit can get to a massive size (20kgs or 50lbs)…our are a modest 15lb (7kgs) in weight.

The kenep has just been flowering.  It has a lovely smell of vanilla which attracts honey bees.  Kenep fruit are similar to lychee in that there is an outer shell which you crack into with your teeth and then you bite into a thin soft flesh around a seed.  The great thing about this is that the seeds can be boiled and eaten.  So far, still no sign of fruit this year..

Kenep Flowers.
Kenep Flowers.

This is a grub that we found whilst digging around for sweet potatoes.  In Australia, they call them “Witchety Grubs” and traditionally they are eaten raw.  Gnome has eaten one before and said that it wasn’t that good…a bit over-rated!

Witchety Grub.
Witchety Grub.

We tried to throw this at a duckie and she looked at us in a “duckie” way…a sideways neophobic and partially horrified look…

Duckie Look.
Duckie Look.

Looks like she doesn’t know what to do with the Witchety Grub!

Rice-Banana-Coffee Beer Tasting.

Liqueur.Tasting.TogetherDo you remember the Mystery Beer which was made about 2 months ago?  Yes, the one that involved lilac sheets!  This was bottled last Wednesday and at that time, I had a quick taste and I have to admit that I just noted the “burnt” flavour from the coffee but nothing to get overly excited about.

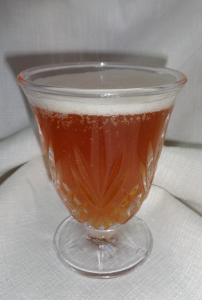
Rice-Banana-Coffee Beer.

Well, here is the tasting after one week of bottling:

Colour is red amber and very effervescent; small sized bubbles with moderate fizz.  Clear with good head.

Smells like strawberries!  Lovely fresh strawberry smell, like walking through a strawberry field.  There is a lingering berry sweetness.

With the first sip, there is an immediate delicate and distinct taste of strawberries!  There is a mild sourness and the last flavour component is the coffee taste which compliments the whole experience.

Wow, this tasting is truly amazing!  I can not believe that a beer can develop such complex taste components in just 7 days.  It has captured the taste of delectable strawberries even although this fruit is not an ingredient.  The rice and banana combined has given this unique and fruity taste.

After this tasting, I thanked Gnome for his love and discipline in making beer (and his general practices in life).  It is quite interesting to note that Gnome does not drink much and in fact, makes fermented beverages because he actually enjoys the whole making process.

Thank-you Gnome For Your Fermentation Magic!

Hatcho Miso Belize Style.

Gnome.Straight.SmileMiso Madness is almost over as the Munchkin is starting to feel twitchy over our dwindling supply of soap…Together.Munchking.Pointing

…which means that our run of frenzied fermentation is coming to an end and the previously, prematurely terminated Soap Marathon is going to have to resume (yeah, our soaps are really popular and people just can’t get enough of them; this is A Good Thing, she tells me ;-P).

After the frenzy of rice koji making and the resulting shinshu and shiro misos, we are ending our run with a couple of pig tail buckets of hatcho miso.  The first bucket was made two days ago, however, it turned out to be about a gallon short because I held back some of the black bean koji to reinoculate the next batch of beans.  There was a slight set-back with that particular batch (yes, yes, I’m sure you’ve heard about the Great Bean Bungle…let’s move on…) and to make a long story short, another batch had to be introduced into the equation.  Anyway, back to the short bucket:  I just “happened” to have a gallon batch of miso from last year which was made with cacao beans and while very aromatic, the chocolate taste was just too overpowering (yes, chocolate-lovers, this is actually possible!).  So, we emptied all of the containers, mixed them together again with the addition of bird peppers (Korean-style??) and a generous handful of black peppercorns.

Mixing Black Beans, Last Year's Chocolate Miso, Chilli Peppers and Black Peppercorns.
Mixing Black Beans, Last Year’s Chocolate Miso, Chilli Peppers and Black Peppercorns.

And voila’, the first full bucket of Belizean Style Chocolate (Cacao Bean) Hatcho Miso (with chilli and black pepper) was born:

Super Hatcho Miso.
Super Hatcho Miso.

Time to start thinking about soap…

Bean Bungle Burger!

Munchkin.UpsetJust the other day, Gnome had mentioned that we seemed to be  eating beans everyday.  Like a good Chinese woman, I blinked once and then placidly ignored his comment.  I am sure that all of you out there will understand that once in a while, especially during wild intense times of fermentation madness, one can get rather tired and have little energy left to cook fanciful foods daily.  Hence the reason why I haven’t been posting up recipes lately.

However, Gnome added insult to injury and did a big whopper of a bungle.  During Hatcho Miso preparation, he over-cooked a tonne of black beans which could not be used for miso making.  He left me with 40 cups (22 lbs or 10 kgs) of mushy black beans and urged me to “make them go away, please.”

Over-cooked Black Beans.

And so with a teeny little ounce of creativity which I squeezed out by sheer willpower, I managed to create a recipe with the excess black beans.  They are bean burgers made with home-made coconut flour and rice flour; they are especially spicy with whole black peppers and chilli peppers.  I have called them Bean Bungle Burgers.

Bean Bungle Burgers.

When we sat down to eat last night, Gnome rather sheepishly said, “the beans are good.”  I smiled and gave him a Chinese woman approving nod.

Another.Smiling.Gnome


Beef Jerky and Chilli Mead.

Gnome.Surprised.No.GlassesBrewing has come to an end…boo-hoo!  After completion of the Resurrection Metheglin there was one last brew bucket to be used and alas, this is what has happened, the final fermentation:  Black Pepper Beef Jerky and Chilli Metheglin.

All Buckets have been used.
My collection of trigeminal buckets.

The idea for this unusual mead had its inception from reading an old article on Cock Ale.  Apparently, an old, parboiled cock (a rooster, you sick folk ;-P) that has been flayed, stamped in a stone mortar and put in a sack with other aromatic goodies can be steeped into ale to add just a little bit more body!  Well, with a leap of tangential thinking, derailment and frank thought disorder, I took Cock Ale and got…ta-da…Beef Jerky Mead with Chilli!

Black Pepper Seasoned Beef Jerky Ready to be Simmered.

Extrapolating (or intrapolating or just plain guesstimating) from the original recipe of one cock for 10 gallons of ale…and making some assumptions as to the size of your average Belizean cock; and, also, considering the difference in flavour between fowl and beef…we settled on 250g of beef jerky for five gallons of mead.

This is the amount of chilli pepper we used:

Pepper for Beef Jerky Mead.

…a nice, wild hybrid of jalapeno (sorry, no tilde) and bird pepper that turns purple before red.

I aimed for a slightly higher strength of alcohol than usual (6-7% alcohol) in order to better hold the expected heaviness from the beef and chilli; which in this case, was achieved with four and a half “quarts” of Belizean Rainforest Honey…

Belize Honey "Quarts."
Belize Honey “Quarts.”

The beef jerky was simmered with half the chilli for about an hour without the honey, making a nice and spicy beef broth.  After which, the honey was added and brought to the boil for a second before cooling and pouring into the brew bucket.  The yeast used was my standard “evolving” lager yeast.

Let’s see how it turns out!

Making Coconut Flour and Cream.

TogetherMaking Coconut cream and flour involves quite a few steps, a little muscle, time and diligence.  When you do everything from scratch, you realise the value of what you are actually making.  The making of the cream and flour go hand in hand as you will see from the following steps:

Firstly, Gnome has to climb a coconut tree to harvest and then he de-husks them.  Next, he splits them in half and grates the flesh with a shredder attached to a hand-drill.

Grating Coconuts.
Grating Coconuts.

The next step is to squeeze the liquid out of the coconut.  I usually add some boiling water to the coconut and I squeeze the shredded coconut through a muslin cloth to get all the milk and cream out.  This is done in small portions in order to maximise the quantity and once all the milk/cream has been extracted, the shredded coconut is placed in trays and laid outside to sun-dry.

Coconut Meal Ready For Drying.

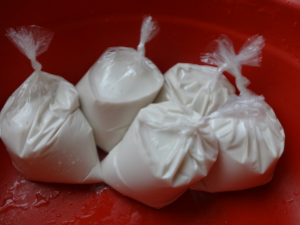
Meanwhile, the liquid is placed in the fridge and as it cools down, the milk separates to the bottom and the cream forms a layer a the top.  The cream is skimmed off the top, a number of times, and poured into these bags for selling:

Coconut Cream For Sale.

Each bag contains the fresh cream of one coconut.  Belizeans like to cook rice with this; a Belizean cook in Punta Gorda told me that he just needed one of these bags to cook a 5lb pot of rice.  Another great way to use this cream is to indulge in a pina colada or blend with fruit to make a yummy coconut “shake.”  You can even use it in bread making to give a silky texture to a loaf.

Usage and Storage of Coconut Cream:

Our coconut cream is sold in the frozen state.  Store in the freezer.  When you are ready to use, simply use it in the frozen state.  If you only require a small amount, cut off a chunk with a knife and store the remaining cream in the freezer.  The shelf life of this product is 6 months if stored properly in the freezer.

Anyway, back to the shredded coconut; it takes about 6 to 8 hours for it to completely dry in the sun.  Once dried, the coconut is put through a stone mill to grind it into flour.  You end up with a fluffy meal which is perfect for breads, pancakes and muffins and it is has the added bonus of being gluten-free.

Coconut Flour.
Coconut Flour.

The coconut flour has a nutty flavour which adds texture to all kinds of foods.  1lb (454g) of this flour contains the meal of about 6 to 7 coconuts.

Usage and Storage of Coconut Flour:

Coconut flour is highly nutritious so should be stored in the refrigerator or freezer.  The coconut flour can be stored in the fridge for up to 2 weeks.  Otherwise, it can be stored in the freezer for up to 6 months.  We usually deliver this product in the frozen state; in order to thaw this product, simply place in the fridge for 24 hours.

We are currently selling coconut cream, stone-ground coconut flour and rice flour within Belize.  The coconut cream can only be sold within Punta Gorda.  However, flours can be transported anywhere within Belize.  Please check out The Apothecary for our Health Food prices.

Resurrection Metheglin.

Glasses.Gnome.More.ShinyAs l contemplate the Miracle of the Resurrection, like all good Catholic Gnomes do, I decided to dedicate and make a gesture in Celebration of this Time by humbly naming my latest fermentation effort:  Resurrection Metheglin.  As all mead drinkers know, a metheglin is a type of mead that has herbs and spices added to it in order to alter the taste and/or properties of the basic honey and water ferment.

In this particular case, I have used liquorice root, star anise and Ligusticum wallichi, also known as Chuanxiong Rhizoma in Traditional Chinese Medicine and also as Szechuan Lovage.  The star anise and liquorice root add that sweetish, unctuous and mouth-coating flavour while the Rhizoma adds a more earthy, complex and spicy aroma that has hints of fennel and celery.

Licorice Root, Star Anise and Ligusticum wallichi used to make this year's Resurrection Metheglin.
Liquorice Root, Star Anise and Ligusticum wallichi used to make this year’s Resurrection Metheglin.

The rest of the recipe is made with our usual Rainforest Honey and Toledo Rainwater adjusted to our (mild) preferred strength of 4-5% alcohol content, the final intention being to have a sparkling product closer in character to beer rather than champagne.  Oh yes, I’ve used the lager yeast that I have been babying along all these months in an attempt to “evolve” and adapt to our local honey and high temperature mead conditions.

May we all find some measure of Enlightenment at this time.

First Active Blub from Melomel.

Together.PointingGood Friday to all and a Good Fermentation Friday too!  We just got our first active blub from the melomel…this is when it starts bubbling through the air lock. It is a very important milestone in childhood…oh no, I mean fermentation development (another Doctor joke)!  With experience, the Blub Blub comes in different pitches and this one is rather tinkling, melodic and rather loquacious.  Gnome says it sounds like it wants another sibling…oh no, he means another fermenting bucket for company!

Anyway, let us get give you an update on our fermentation adventures:  Firstly, we had to sadly dump the two gallons of coconut shiro miso, which we had so joyfully made up last week.  This was on account of the dreaded Bongkrek.  Last week, we read an article on Tempeh Bongkrek which is a variety of tempeh prepared with coconut.  This food has now been banned because it can get contaminated with Burkholderia gladioli which leads to the release of bongkrek acid which is lethal to humans.  Being doctors, we started thinking about this a whole lot and wondered if we had made Bongkrek Miso!  And Gnome said that it would be really embarrassing for the demise of two doctors in Belize to be attributed to coconut miso (death by coconut)!  After that comment, I decided to use the coconut miso as compost around the farm!

Gnome wants to ask a question to any microbiologist out there:  is there any risk of bongkrek with miso (made with coconut) which has already been innoculated with Aspergillus oryzae?

To make up for this unfortunate mishap, we made some shiro miso today…just with regular black beans…nothing too exotic.

Mixing Shiro Miso.
Mixing Shiro Miso.
Shiro Miso Ready in 8 Weeks!

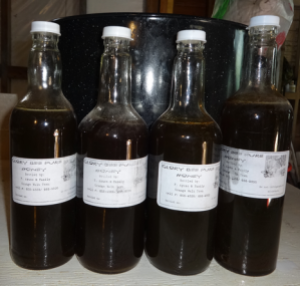
We had a look at our bucket of soya sauce which was started in July 2014 and gave it a whizz with the paint stirrer:

Paint Stirring Soya Sauce.

We felt that the soya sauce was rather thick and paste-like in texture and therefore we made an executive decision to just use it as miso.  It tastes similar to miso, a bit more acidic and fruity but nonetheless palatable.  This solves the problem with the miso shortage until the new shiro miso is ready in June.

Making Melomel.

Another.TogetherAnother jam-packed day of fermentation!!  This is really a Gnome post but I will make a serious attempt to chronicle the day in the same enthused manner as Gnome.

Well, we started the day off by bottling the mead, which never cleared.  Gnome gave me a glass to sample and I promptly scoffed it all down and told him that it was very palatable.

Next, Gnome attended to his Rice Koji in between all the bottling and brewing.  He is trying to develop a new system of inoculating cooked rice with previously made rice koji.  That way he doesn’t need to use up Koji starter and he can feel assured that he can keep on making rice koji without the headache of bringing in the starter from overseas.  This experimental batch is going really well and the Aspergillus oryzae seems to have colonised well and formed a lattice network.  This new system is called: Special Care Koji Unit (SCKU)…this is a bit of a Doctor joke so please bear with our awful sense of humour!  As you can see from the picture, Gnome has fashioned incubators for his koji babies:

Koji Incubators.
Koji Incubators.

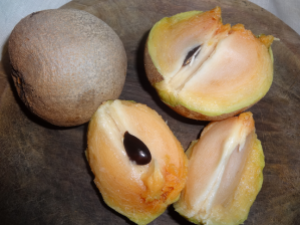
And yes, we are making melomel which is mead which contains fruit; in this case sapodilla and carrot were added.

Sapodilla Fruit, Ready To Eat.

I won’t go into the technical parts of making melomel because this is going to be a Bored-in-Belize project (Gnome:  I’ve added the recipe right HERE) so I will just give you a brief run-down of what we did.  Firstly, sapodilla fruit was placed in a  heated pot of water and allowed to partially breakdown.  Next, the mixture was filtered and the pulp was squeezed through muslin.

Sapodilla Wort.
Sapodilla Wort.
Straining Sapodilla Pulp.
Straining Sapodilla Pulp (Gnome feet prove that this really happened!)..

This part was a Munchkin job:

Squeezing Sapodilla Pulp.

After the liquid was procured, Gnome measured the specific gravity and added 6 quarts of honey to make up the alcohol content to about 12%.  As we speak, Gnome is re-heating the whole mixture including the added honey; he will allow it to cool down overnight and then add yeast in the morning.  More fermenting tomorrow…